Add custom backgrounds in Premiere Pro?

In today’s tutorial, we’ll show you how to customize and use one of our Virtual Sets using Premiere Pro.
Our setup today uses several elements:
- First, there’s video with a Presenter working on a green screen background
- There’s also a social media Lower Third graphic
- An animated, green screen Monitor that will be positioned to drop from the ceiling, into the frame next to the Presenter, and automatically play
- B roll footage that will be placed into the green screen Monitor
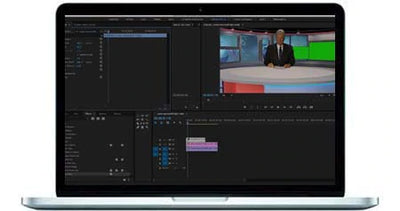
So, when it’s done, it’ll look like we’ll have a Presenter, talking on screen, behind a real studio set, with a monitor showing a presentation made from B roll. There are a few ways to add these elements together to create our scene. Today, we’ll show you one of the best ways to achieve this.
You can also follow along watching our Green Screen Tutorial video on YouTube.

Step 1: Start by making a new sequence
First, we’ll create a new Sequence in Premiere Pro. We do this by dragging footage (already imported) down to the Create New Sequence button at the bottom of the screen.
The footage we’re using is shorter than the scene we have planned. But luckily, since it’s one of our Virtual Set green screen backgrounds, we can easily extend the running length. We do this by right clicking and adding a Frame Hold, then using the mouse to drag it to the correct length.
Step 2: Keying the Presenter footage
Next, we add in the green screen of the Presenter, dragging it from the Project Panel where the files are imported. We’ll add a key effect to the footage to get rid of the green screen on the Presenter. We start by pulling up the Effects menu, then searching for Ultra Key. We drop and drag the effect onto the Presenter footage.
We use the Effects Controls to finish, using the eyedropper tool and selecting a portion of the background, keying out the green. When finished, we just have the Presenter in front of our Virtual Set layer (the studio.) We’ve placed the Set on the bottom layer.
After reviewing the key, we tweak the image some more, using the Effects Control panel, and changing to the Aggressive key method to get rid of more green, and clean up the edges.

Step 3: Using lower third graphics
From the Project Panel we add the social media Lower Third (YouTube), delete its audio. We put the graphic on top of the other layers, scaling and repositioning as needed, so the lower third fits next to the Presenter.
Step 4: Adding the animated monitor footage
We drag the animated Monitor video to the timeline. As mentioned, the video starts with the monitor at the very top of the frame, then lowers until it’s next to the Presenter, mid frame. The monitor will start with a black screen before displaying the B roll, we’ll be adding later.
Using Ultra Key on the monitor
First, let’s do another Ultra Key. Again, we go into the Effects Panel, drop and drag the key effect onto the footage, then use the Effects Control panel for necessary adjustments. Once done, the monitor is “keyed out.” Now, whatever footage is positioned directly beneath this layer will show, looking as if it’s a real Monitor playing video, instead of being two separate videos (Monitor and B roll) composited together.
Shortcut to move clips
Since we put our other footage on the lowest layers earlier (layers 1-3), now to get the B roll directly beneath the Monitor, we’ll have to move everything else up one layer. Then we’ll have space to move the B roll to Layer 1. This will let the B roll video (a luxury building by the waterfront) show through the Monitor screen
To do this, we’ll highlight the other footage on the timeline, using the mouse. Then the clips still highlighted, hit ALT + UP Key. Everything will move up one layer each time you use this shortcut
Nesting your clips
Sometimes when working with multiple clips like this, you may want to nest some files together. We do this here, by right clicking and selecting Nest using the drop-down. This is useful because if you add other B roll footage, change your footage, add graphics, etc. when you scale and reposition the Nested Sequence, everything will be edited at the same time.

Adding B roll to monitor
Now that the B roll footage is a Nested Sequence, we need to position and time the animated monitor’s ceiling descent.
One easy way to do this is to let the monitor remain black, then a second or two before the Monitor’s movement begins, have the B roll fade up slowly, so it looks like a TV when it’s first turned on. We do this using a Dissolve Transition on the B roll footage.
Adding a mask to clean up green screen
We reposition the Presenter footage a little, using the mouse. But we notice there’s still a little green left over from the keying effect. To get rid of this, we add a Masking effect using the Pen tool.
Step 5: Adjusting running time
Now, we’ll extend the B roll footage a little longer to make sure everything stops at the same time as the Presenter and our Virtual Set footage. There’s two ways to do this
Method 1
We can duplicate the B roll footage in the Nested Sequence, as much as needed
- We then edit the files within the Nested Sequence, dragging out the clip(s) to where we want the footage to end
- Then we adjust the length of the Nested Sequence itself, as needed
- Finally, we add a dissolve to the end of the Nested Sequence as the retractable Monitor begins to retract to ceiling—so that it fades out, just as it faded in
Method 2
If we wanted it even longer, we could use the Razor tool and slice the Monitor footage just before it begins to retract. Now we have two pieces of clip footage.
- The first part of this footage, where the monitor first descends, all the way up to where it begins to ascend is the longest piece. At the end of this clip, we’ll add a Frame Hold. Now, you can extend the Nested Sequence as needed.
- The smallest piece, the footage of the monitor ascending for the final time, can now be placed at the very end.
This method allows you to stretch out the middle as long as you need.
Just for fun, you can even throw in a second Monitor clip with footage coming in from the opposite side, just as the first Monitor finishes and begins to ascend to the ceiling.
Now try it for your next project
This concludes our tutorial. If you want information about our Virtual Set Labs products or have other questions, check out our www.virtual-studio-set.com website today.