How to Use a Green Screen Virtual Set in OBS
OBS stands for Open Broadcaster Software and it is a fantastic option for video producers looking to create live video streams to Facebook, youtube and more. With the ability to perform real time chroma key / green screen effects and other live elements, it is one of the best options for live production. And best of all, it is 100% free!
OBS GREEN SCREEN: The Movie
For those that would rather watch a tutorial, here is a video version of our OBS green screen tutorial. It's packed full of catchy tunes, fancy text work and a special guest appearance by a very famous Jedi apprentice!
For those who prefer the written word, proceed to the blog post below.
STEP 1: Setup a Green Screen & Film Your Presenter
Hang your green screen behind your presenter/subject/jedi, setup your lights and position your camera. In our video tutorial, we used a webcam, but you can use either a webcam or another camera that you can use as a video input device on your computer.
When lighting your green screen, be sure to remove as many wrinkles as possible from your green screen materials and light the screen as evenly as possible. This will help the computer to remove just the green from your scene.
STEP 2: Start OBS Create a New Scene & Name It
Open the OBS software (available as a FREE download here: XXXXXXXXX) then create a new scene and name it.
STEP 3: Create a New Video Capture Device Source & Select Your Webcam / Video Source
In the bottom left hand corner of the screen, create a new video capture device/source and select your webcam or video source.
STEP 4: Double click your Webcam / Video Source to Configure the Video
To configure your video source, double click it in the source list. You can then adjust zoom, crop, focus, sharpness and apply a chrome key to remove the green screen in the scene.
STEP 5: Adjust Zoom, Focus, Sharpness, etc..
Adjust your zoom, focus and sharpness in the configure video source panel.
STEP 6: Scale and Position Your Presenter
Using the scale and position tools, scale and position your talent / presenter in the scene.
STEP 7: Add a Chroma Key Filter to Your Webcam / Video Source
Right click your webcam / video source and click filters
STEP 8: Add a Sharpen Effect to your Video if Desired
If your video seems a little soft/fuzzy, try adding a sharpen filter as well.
STEP 9: Add Chroma Key Effect to Remove Green Screen
Add a chroma key effect to remove the green screen in your scene.
Choose Chroma Key Type
Select either color type or custom color to sample your green screen for removal.
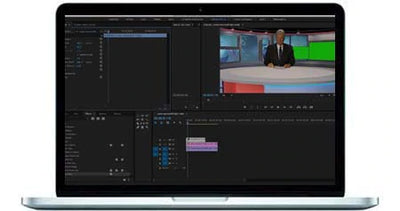
STEP 10: Drag & Drop A Virtual Set
Close the filter box after you are happy with your chroma key. Next, drag a virtual set from finder / windows explorer to your source list. OBS accepts mp4, jpeg, PNG and many other file types to be used as background sources.
STEP 11: Loop Virtual Set
If you are using a looping video for your background, double click the loop name to display the input properties. In the properties, you can set the clip to loop.
STEP 12: Re-Position Presenter in Scene
If needed, re-position your presenter in your scene.
STEP 13: Create Variations of The Scene
Now that you have your main scene setup, you can easily duplicate your scene and make changes to the backdrop and position of your presenter that you can then recall live during your stream.
STEP 14: How to Change Scene During a Production
To transition between scenes you have created, you can simply select the scene in the bottom left hand corner of the screen and OBS will automatically transition between the scenes.
Using this technique, you can use multiple virtual sets, angles and scenes to create a varied broadcast.
STEP 15: Adding A Monitor to the Scene
If you would like to add a tv monitor to your scene you can either add a scene that contains a monitor or just add the video feed and scale / position the video into your scene.
In our example, we have a monitor with a green screen in it, we will add a chroma key effect to the virtual set source and remove the green in the monitor to show the b-roll video on the layer below.
STEP 16: Adding B-Roll Video
Drag and drop video and/or images into your scene area from finder / windows file explorer.
STEP 17: Scale and Position B-Roll Video
Coffee tastes have changed so much that I remember around 2012. It's is after all the seed of a fruit. From then on, we began to work at a gradual pace, turning up the brightness a little, season after season. Today we can proudly craft a coffee with notes of lemon meringue, strawberry or passionfruit and find people on all sides of the counter are learning and developing their pallets.
You're Done!
Coffee tastes have changed so much that I remember around 2012. It's is after all the seed of a fruit. From then on, we began to work at a gradual pace, turning up the brightness a little, season after season. Today we can proudly craft a coffee with notes of lemon meringue, strawberry or passionfruit and find people on all sides of the counter are learning and developing their pallets.
We hope you enjoyed this tutorial! If you are interested in the virtual sets used in this tutorial, please check out the products below!