Using Virtual Sets in vMix Live Streaming Software

When streaming live video, it is important to ensure that the video quality is as good as possible. This can be done by using virtual sets in vMix Live Streaming Software. Virtual sets are pre-made sets of footage that can be easily used to create a seamless stream. This allows viewers to focus on the content rather than the technical aspects of the stream.
Rather watch a video? Check out our video tutorial below:
Virtual sets are becoming increasingly popular in video production as they allow for a much more versatile and flexible performance. However, using them can be difficult if you are new to the product. This article will explain everything you need to know to get started with virtual sets in vMix. We will also provide tips for setting up and using virtual sets and some other things you should know about vMix.
Setting up virtual set into vMix
Setting up a virtual set is straightforward and can be done in just a few minutes. Here are the steps:
Step 1: Import the virtual set into vMix
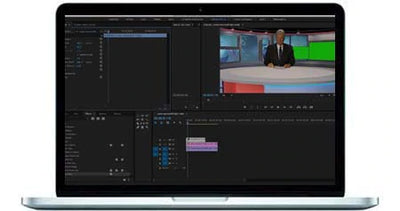
To import the virtual set into vMix, go to the Media tab and select Virtual Set. Click the Import button and select the File. The set will be added to the library. Drag it from the library to the preview window to use it in a scene.
Step 2: Determining how big the virtual set should be
To set the size of a virtual set in vMix, you must first determine the resolution of your project. This can be found by opening vMix and going to File> Properties. The resolution will be listed under "Output." Once you know the resolution, you can use that to determine the size of your virtual set. Most sets are designed for a certain resolution, so you will need to find one close to or matches the resolution of your project.
If you are outputting in HD, you will need a set that is at least 1920x1080. If you are outputting in SD, you can get away with a smaller set, such as 1280x720.
Step 3: Set the background color of your scene
When working with virtual sets, setting the background color of your scene can be helpful. This will help create a more cohesive look between your graphics and the background of your scene. To set the background color in vMix, follow these steps:
- Open vMix and select the "Settings" tab.
- Under "Outputs," select "Background Color."
- Select the desired color from the color wheel or enter the hex code for a specific color.
- Click "OK" to save your changes.
Step 4: Add the virtual set to your scene
When you are setting up your virtual set into vMix, adding the virtual set to your scene will help to ensure that your viewers see the virtual set properly. To add the virtual set to your scene, go to the "Add" tab and select "Virtual Set." This will open a new window where you can select the virtual set you want. After selecting the virtual set, click on the "OK" button, which will be added to your scene.
Step 5: Add your content to the scene
You can do this by clicking on "Import" and selecting the File with the content. The set will then be added to the "Virtual Sets" tab.
You can then drag and drop the set into the scene. To resize or rotate the set, you can use the tools in the top-left corner of the scene. You can also add text or graphics to the set by clicking on "Add" and selecting what you want to add.
Step 6: Render your scene
When rendering your scene, it is important to consider the final output. This includes understanding the various rendering options and their effects on the scene. The most common rendering options are:
The first option, "Draft Mode," is designed for live streaming or use with lower-end machines. It renders only the essential elements of the scene and can be useful when working with limited processing power.
The next two options, "High Quality" and "Ultra High Quality," render the scene using more processing power but with better results. These two settings are best for final output or recording.
Finally, "Preview" renders a low-resolution scene version that helps verify camera angles and other setup details before starting production.
Setting up a virtual set into vMix is a fairly simple process that can be completed in a few steps. By following the guidelines in this article, you should be able to have your virtual set up and running in no time.
Changing the camera angle in a virtual set
When you're using a virtual set, the camera angle is important. You want to make sure that you're getting the best shot possible. Here are some steps to follow when changing the camera angle in a virtual set:
- Make sure that your virtual set is open. You can do this by clicking on the "Virtual Set" button in the toolbar.
- Click on the "Camera" button in the toolbar. This will open up the camera controls.
- Use the "Pan" and "Tilt" controls to adjust the angle of your shot.
- Use the "Zoom" control to adjust the zoom level of your shot.
- Click the "Close" button to close the camera controls.
Adding text or graphics to a virtual set
Adding text or graphics to a virtual set can be a great way to improve the overall look of your production. Here are the steps you need to follow:
- Import the image or text you want to use into vMix.
- Resize and position it where you want it on the screen.
- Apply an effect to make it look like part of the virtual set.
- Change the opacity if needed.
- Preview your work and make any necessary adjustments.
The Dos and Don'ts of virtual set editor in vMix
VMix offers a range of features for creating and editing footage. But with so many options available, how do you know which ones are the best for your needs? Here is a list of the Dos and Don'ts:
Dos:
- Use the grid to line up your shots
- Create and save presets
- Use the color picker to match your set
- Use hotkeys for speed
The Don'ts:
- Don't overcrowd your scene
- Don't use too many effects
- Don't make changes that can't be undone
- Don't forget to save your work
FAQs
What software do I need to use virtual sets in vMix?
There is no specific software required to use virtual sets in vMix. However, you will need a 3D rendering program to create the 3D environment for the virtual set. Popular programs used for this include Cinema 4D and 3DS Max.
What is the difference between a live streaming and a virtual set?
Live streaming is a video broadcast of an event as it happens, while a virtual set is a video that uses a computer-generated environment to create the illusion of a different location.
Conclusion
Setting up a virtual set into vMix is a relatively easy process. By following the steps outlined in this article, you should be able to get your virtual set up and running in no time. Additionally, a few things to keep in mind when setting up a virtual set, such as ensuring that your graphics card is powerful enough and avoiding certain resolutions. By following these tips, you can ensure that your virtual set looks great and functions smoothly.