How to get the PERFECT GREEN KEY in Adobe Premiere Pro!

--
Green screening or chroma keying starts when you shoot. 99% of the success of your keying is filmed. That's how your green screen and lighting is set up. I have a very old video where I explain how you can set up a green screen in your garage.
Prepare to laugh at how I used to make videos, but the tutorial part is still relevant today. I'll leave a link below because in this video I want to show you how the Premiere site works. So I have a clip of myself wearing a blond wig as I heads bang around.
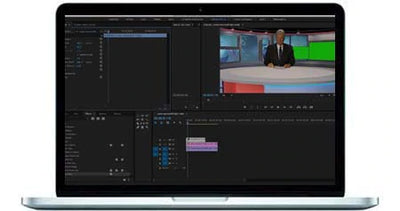
This is a nightmare and I don't mean myself, but the actual drinky blond hair is not easy. Definitely not with all that movement. So it's the perfect example for this tutorial. All right. First things first with the clip selected, head over to the effects controls and locate opacity from which you want to take the pen tool.
Draw a mask as tight as you can around yourself. We're essentially removing anything outside of the green screen. This type of masking is also called garbage matte as you want to remove the garbage. All right. So now let's look for the ultra key effect in the effects library and drag that over to the clip.
Jake, the color picker to select the green in your shot. And I usually select the parts closest to my hair as you want the best sample to come from there. Now, if you hold down the control key or the command scheme for the Mac users, you can see that the figure becomes slightly bigger.
This takes a wider sample, which is oftentimes better. All right. So now click with your mouse and good job. You've just pulled a green key. Now we're left with a lot of noise. And one way of reducing that is by working with a noise there before you're going to pull that key.
And fortunately, the good noise that's out there are peat. Although I can highly recommend the one from Red Giant, it will not cover it as I only want to work with built in plugins. So let's jump into the Matte Generation option.
With these five settings, we can further tweak the keying, but first we're going to change the output view to Alpha and this is going to show the keying mats, everything white is what we see and everything black is removed.
This makes it easier for us to see where we need to find you. The transparency is an overall clean control. I usually don't touch this as it affects the entire shots. The highlights controls, the opacity and the lighter areas, which is oftentimes the left overs and the green screen.
So if we decrease that, you'll notice that the background is getting better. The shadow control does the same, but for the darker areas, I'm wearing a dark sweater, so by decreasing that value I can remove the noise from there.
However, this will also introduce back noise in the green screen. That's because I might have a darker area here in the bottom, so pay very well attention to that. The tolerance is again something that you shouldn't change that much.
It defines the range of the key. You've already picked a bigger range when selecting the key itself. Finally, the pedestal is going to filter out the noise in the white areas. So this is going to be an important control.
In short, you're going to work with the highlight shadow and better still controls the most. As a general rule, you went to make as little adjustments as possible. You know, just a little reminder. But if you're older, you learn something new.
At this point, you can press that like button or not yet. But don't forget it. I'm still left with some noise in the white. And although I could remove them by making drastic changes, it will affect the hair too much.
So we're going to fix that differently. But that's for later. First, let's find a background, and the best place to do that is on story blocks today, sponsors. Now, it's a community driven library filled with over a million royalty free, high quality stock assets, such as animated backgrounds.
We can find different categories. Let's speak technology, and I really like this one as it encapsulates my blond hair. On the left, we have more options to further tweak our search and download in HD or 4K resolution, but apart from backgrounds, we can find so much more stock assets and various themes and drawings.
There are even collections so that I can download multiple clips from the same scenery. There are also tons of after effects and Premiere Pro templates, visual effects, overlays, even music and sound effects or illustrations, photos and images. Three blocks allows me to work fast or save time and money without sacrificing on quality.
They're enormous. Library always has something that goes in line with my creative vision and with the unlimited all access plan. You can download unlimited video assets, allowing you to try out different options to find the perfect fit. But there are also other plans one for everyone's needs.
So definitely check it out by heading over to three blogs dot com forward slash perimeter basics or simply click the first link in the description down below. All right we can set the output back to composite and view are working on my chosen backgrounds which simply sits in the track below.
Now your key should already look good at this point. We're still left with a little bit of green spill, definitely in the hair, but we'll deal with that later. First, let me go into the mats. Cleanup options. I do not recommend using these unless you really have to.
We can choke the keying, which is oftentimes needed to get rid of that thin edge around your subjects. For my that's not necessary, which means that my set up was good, soft and will soften the edges. This is oftentimes very tempting as it seems to make your looking better.
But it does. You want to use this if you're left with noise in the edges, softening those edges can hide that a little bit. Finally, contrast which separates the subject more from the. Background. And although that sounds good, things like hair should not be separated too much.
We need to retain some transparency in there. So this option is good for when you're shooting a subject that is bald or wearing a hat, for instance. And finally, the midpoint controls where that contrast needs to be focused on.
So these two options go hand in hand. But again, everything under the Met's clean up options are best to be avoided. A good green screen setup only needs two basic controls up here. All right, one last thing, and that is to remove any spill color.
And although there are some options for that down here and yield tricky effects, I'm not going to use those as I find them tedious to work with and I never get good results. Instead, we're going to use the metric and go over to the H as L secondary tap for the color key, click on green.
As for working with a green screen now I'm actually going to move my selection up a little bit to the yellow you. As I do that, you'll start to see the parts of my hair that are being now selected.
That's because the yellow for my blond hair is getting mixed with the green. You can also shift over to the other side. If you notice green spill in the blue areas. It's always going to be a color around the green you that the ultra key wasn't able to kick out.
Once you have your selection on the bottom, we can then color great that selection. Now either we simply decrease the saturation which is going to get rid of that spill or you put some magenta in there, the opposite of green.
So we're basically neutralizing that green spill. Which technique you use depends on your shots. Definitely try both and see what works best. Finally, you can increase or decrease the brightness of that spill. Usually that's going to depend on the backgrounds.
In this case, a little darker. Works best for me. Your green key should be perfect right now, although I'm still left with that noise on my chest, which is mostly green. It's because of that hair. This is a common problem.
Objects in the foreground that take reflections from the green screen. And the best way to remove that is by duplicating your clip, which you can do by holding down the old key as you drag it a track higher.
From this duplication, I'm going to remove the ultra key. You can leave the elementary effects and go into the opacity property to take the pen tool and you want to draw a mask on the part that is still noisy.
In this example, that's going to be my chest. This can be a very rough mask there. Depending on how much you move around, you might want to enable animation for the mask parts and adjust it over time so that you follow your movements and you can see how well that fixes the problem.
It removes some of those gaps. And before you think, Jordie, that is a lot of work for some simple drinking. Well, that is just simply how it's done. In fact, it even goes much further than that in Hollywood.
Don't think that professional teaching is a one click solution. It's usually a whole team that works for days on several seconds of greenscreen footage to get it perfect.